Product Categories
- Arduino Shields
- Breakout Boards
- CAN (Controller Area Network)
- Connectors and Interconnect
- Drivers, DACs & Outputs
- FIRST Robotics Competition
- Formula SAE
- Hardware
- Interface and Logging
- Power Supplies and Distribution
- Qwiic Connect System
- R3aktor Data Acquisition
- Sensors
- Software
- Switches, Encoders, & Buttons
- Temperature Measurement
- Wire
- Discontinued
Tech Article Categories
Table of Contents
Document: 1204
Posted: December 8, 2015
Modified: December 8, 2015
Posted: December 8, 2015
Modified: December 8, 2015
Home > Tech Article Categories > FRC and Robotics > ArgoBot Software Installation
ArgoBot Software Installation
ArgoBot setup guide and troubleshooting instructions
Software Installation
- If it is not already installed, please install LabVIEW. It may be purchased from Digilent using this link.
- Install Linx after LabVIEW is installed. Linx enables communication between LabVIEW and ArgoBot. Its available for download from MakerHub. Additional YouTube video instructions are also available.
- Next, download the latest version of rob00001_source.zip from the ArgoBot product page.
- Follow the Argobot Setup and Blink Tutorial to ensure everything is connected properly.
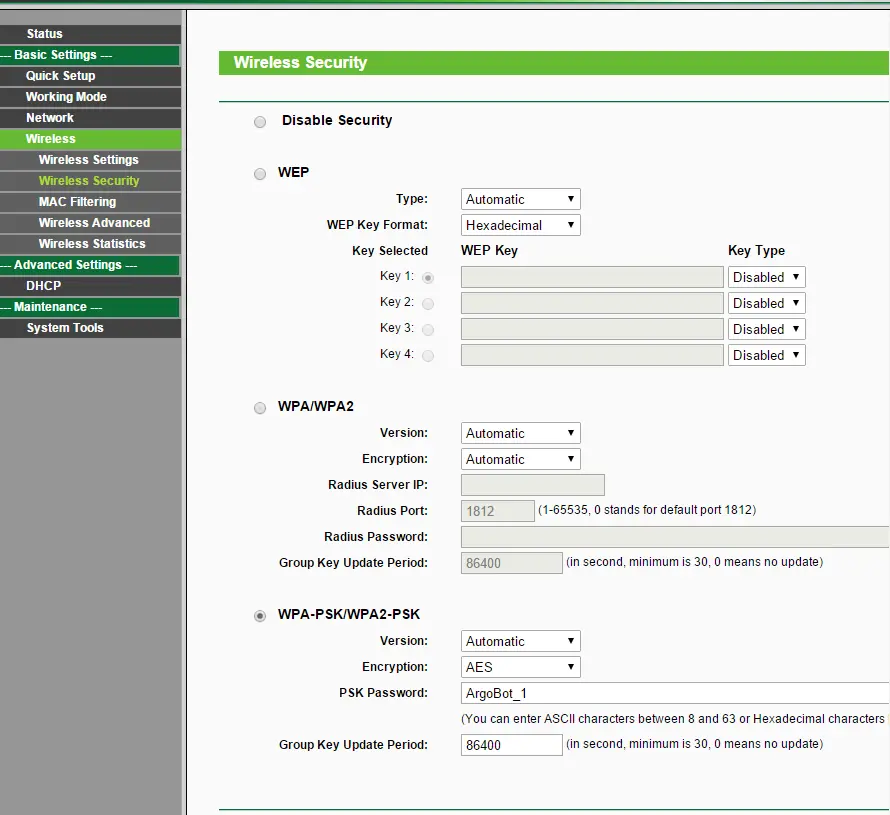
Router Settings
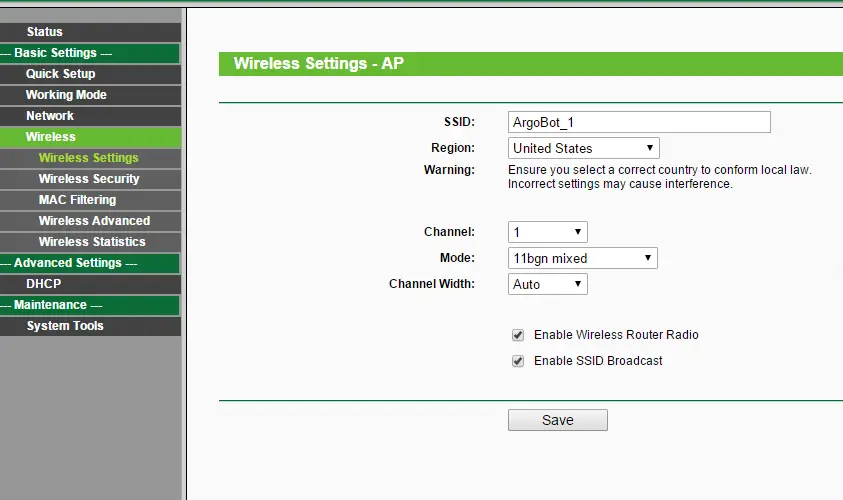
The router is pre-configured when shipped. Router settings should only be changed if you are having connection problems.
- To access the router setting plug the USB and Ethernet cable into your computer
- Turn off your Wifi to assure your computer is communicating through Ethernet
- Go to http://tplinklogin.net
- User Name: admin
- Password: admin
- Below are the appropriate settings for your router
- If you have more than one robot choose a different SSID should for each ArgoBot
- The WPA-PSK password should be set to be the same as the SSID.

ChipKit WF32 Setup
The ChipKIT WF32 is pre-configured as shipment as well. WF32 settings should only be changed if you are having connection problems .
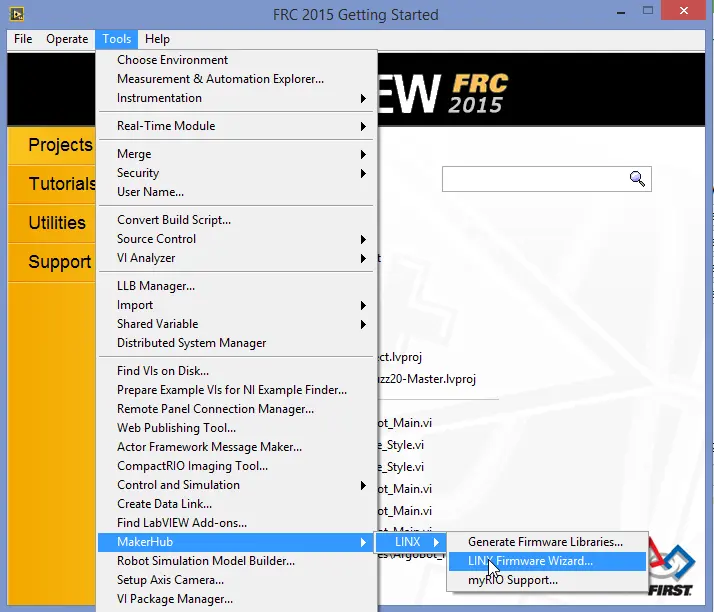
- Connect a USB cable to your computer and ChipKIT WF32
- Open Labview
- Go to Tools > MakerHub > LINX > LINX Firmware Wizard
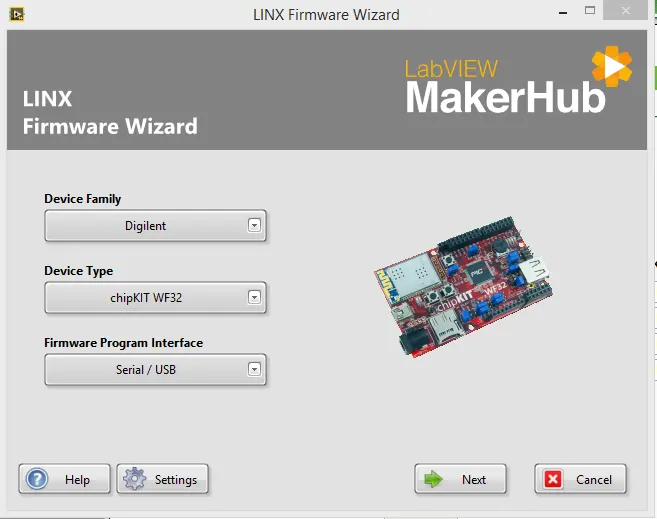
- Select the following
- Device Family: Digilent
- Device Type: chipKIT WF32
- Firmware Program Interface: Serial / USB
- Click Next
- Select the correct USB port and hit Next
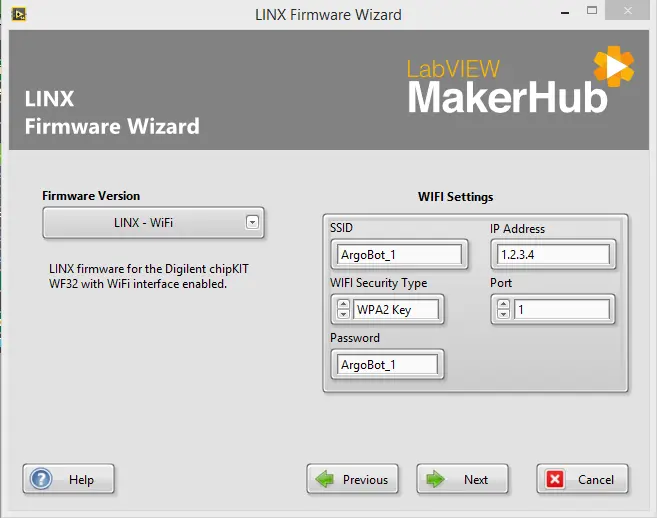
- Select the following
- Firmware Version : LINX – WiFi
- SSID: Argbot_1
- This should match your Wifi router SSID
- IP Address: 1.2.3.4
- Wifi Security Type: WPA2 Key
- Port: 1
- Password: ArgoBot_1
- This should match your Wifi router password
- Click Next
- Click Finish
- Follow the Argobot Setup and Blink Tutorial to ensure everything is connected properly.
Troubleshooting Guide
Robot keeps dropping connection or responding slowly
| Step 1 |
|
|---|---|
| Step 2 |

|
| Step 3 |
|
Robot will not connect
| Step 1 |
|
|---|---|
| Step 2 |
|
| Step 3 |
|
| Step 4 |
|
| Step 5 |
|
| Step 6 |
|
 ArgoBot FRC Driver and Software Programming Trainer Robot